Thursday, July 9, 2009

That’s All Folks!

After much thought . . .

After much internal debate . . .

I have decided to stop updating this blog. I could bore you with all the reasons, (privacy, time constraints, other projects) but I just don’t have the time to keep up with it any longer.

BUT, I will NOT be deleting the blog. The few tutorials I’ve done, the links to the freebies I’ve made, the odd knitting pattern I’ve put up . . . those will all stay right here.

Please, feel free to use those, for personal use, as much as you want. And pass a link to my blog to any new digi-scrappers as it’s always good to have some free things to get started!

I love the blogging community. I read so many blogs every day. I, however, won’t be contributing anymore. It just came down to a simple equation. Not enough hours in the day plus trying to limit the amount of information about my kids online.

Thank you all for your support. It’s meant more than I can say. Truly.

I’m still around.

Reading.

Thanks!

And I hope you all find joy and choose happy. Everyday.

Tuesday, June 30, 2009

Soothing An Itchy Cast

The girl broke her arm.

She has a hot pink, waterproof, cast that she loves.

581-0625

Except when it starts to itch. Then she starts to beg me to take it off.

And the more she thinks about it, the worse it gets. As I’ve never had a cast, I had no idea how to help her. And is there anything worse, as a mommy, then not being able to help your child when they are uncomfortable?

We tried all sorts of scratching items (knitting needles, spatulas, q-tips) but I know that’s a big no-no. But it’s the only thing I could think of. (I did find that a long ice tea spoon is blunt, smooth, and long enough to get some of the itches.

One of the only times it felt good was when we were in the pool. But we can’t be in the pool 24/7. So, I racked my brain and then remembered we had a bottle of Cetaphil in the bathroom. It’s a very mild soap that can be left on the skin. It can be used with water OR if you can’t take a regular bath, it can be wiped on and gently wiped off, leaving a residue on the skin. That residue helps keep the skin moist.

Hmm.

Two nights ago, after washing and rinsing her arm and rinsing more, I literally poured Cetaphil down her cast. I rinsed, then dumped some more.

She had a few complaints yesterday but NOTHING compared to the last few days.

Last night, I poured dumped more in there, lightly rinsed it through the cast, then poured in a bit lot more and added just enough water so that the Cetaphil would wash throughout her cast.

Not ONE complaint since last night.

I’m almost afraid to ask her.

In fact, I don’t. I’m assuming that if she isn’t complaining, it isn’t a problem!

I love the waterproof cast. The amount of water that goes through that thing should keep her arm clean. We’ve been at our pool, which is not chlorine but salt-water, almost every day. Then showers where I basically hook up the nozzle to her arm and run the water through the cast.

But nothing can stop the itchies.

Or can it?

Let’s hope we found a solution. Because listening to her cry and not being able to help . . . ugh. Worst feeling ever.

============
Remember to click
HERE, before July 8th, 2009, if you want a chance to win $250.

Tuesday, May 19, 2009

Spring Poncho

This is the spring poncho I made my daughter.

365-0429

363-0429

362-0429

She wears it almost everyday and I beam with pride whenever I see her because I LOVE it!  For those interested, I used a version of the pattern by the Yarn Harlot found here.

My modifications are as follows:

I used a smaller needle and a cotton blend yarn.  I changed the starts and stops of the rounds so that my color changes would be on the side and not in the middle of the yarn over stitches.  Here goes . . .

Poncho for Girl (about size 6)
(based on pattern by the
Yarn Harlot)

Size 6 circular needles
Cotton blend yarn (2+ balls of dark pink, 1 ball of light pink, 1 ball of green)
2 stitch markers

I'm not sure on gauge.  I counted the stitches on another garment made with the same type yarn and needles and calculated that I needed about 90 to make sure it would fit over her head.  I made it 92 so it would be in increments of 4 to fit the ribbing pattern at the neck.

Cast on 92 stitches.

Work in the Main Color (MC) in rib (K2, P2) for a total of 4 rows.  (work flat)

Join in the round, making REALLY sure there is no twist, and continue in knit for 20 rows with the following pattern.

Round 5: K22, YO, (place marker), K1, YO, K45, YO, (place marker), K1, YO, K23
Round 6: Knit
Round 7: Knit to first marker, YO, slip marker, knit 1, yarn over, knit to next marker, YO, slip marker, K1, YO, knit to end of round.
Round 8: Knit

Repeat this pattern of rounds, a YO round followed by a knit round, for 20 rounds. 
(You'll quickly see the YO patterns will leave the cute holes down the front and back.  You will do a total of four YOs per odd row.  One YO before each marker, a knit, followed by another YO.  Then knit all even rounds)

Switch to CC1 (contrasting color 1, green in my example) and continue the YO round, knit round pattern for 5 rows.
(This is the most complicated part.  Simply keeping track of your rounds and if it's a YO or knit round.  I took a piece of paper and wrote out each row, if it was YO or straight knit, it's color, and then checked them off as I went around.  ***See bottom for my list of rounds for color stripes.***)

Switch to CC2 (light pink my my example) and continue in pattern (YO round, knit round) for 10 rounds.

Back to color CC1 for 5 rounds in pattern.

Then back to the main color for 20 rounds.

Repeat the pattern of 20 in the main color, 5 in color CC1, 10 in color CC2, 5 in color CC1, back to 20 in the main color.  Repeat until it reaches the desired length.  I did about 90 rounds.

Then, in main color, do four rows of seed stitch.   (This is optional.  BUT, if you decide not to add the seed stitch, end on a knit round in the MC.  It will curl up, but after you add the fringe, it will lay flat again.)
Seed Stitch Bottom:
Round 1: K1, P1 around
Round 2: P1, K1 around
Round 3: K1, P1 around
Round 4: P1, K1 around

Bind off.

Make fringe.  I cut my yarn in about 12"-15" lengths, folded in half, and using a crochet hook pulled 2 lengths through every third or so stitch knotting at the top.

(I also knitted a short i-cord and put it in the back so she could hang it on a hook)

366-0429

I also made a toddler poncho for a 1 year old. This is basically the same pattern but I found this version here. It has some fun details that works great with a solid color poncho and it's just perls!  I did some adjusting to get the right size (about 10" in length at the front) and added a rib neckline at the top and shorter fringe.  But same idea!  This took about 1 ball of yarn and was really fun to make!

poncho2

And if you are on Ravelry, look me up.  I'm BethyKnitting!  And if you are a knitter, go apply to join.  The database of patterns is just amazing!

============
Remember to click
HERE, before July 8th, 2009, if you want a chance to win $250.

***list of rounds for color stripes***

Rounds 1-4: work in MC (main color) in rib pattern (K2, P2)
Rounds 5-24: work in MC following pattern of adding YOs at stitch markers on odd rounds and knit in even rounds as described above.

Rounds 25-29: work in CC1 (contrasting color 1, light green in my example)
25: YO round
26: knit round
27: YO round
28: knit round
29: YO round

Rounds 30-39: work in CC2 (contrasting color 2, light pink in my example)
30: knit round
31: YO round
32: knit round
33: YO round
34: knit round
35: YO round
36: knit round
37: YO round
38: knit round
39: YO round

Rounds 40-44: work in CC1 (contrasting color 1, light green in my example)
40: knit round
41: YO round
42: knit round
43: YO round
44: knit round

Rounds 55-74: Switch back to MC and knit pattern of YO and knit rows for 20 rounds. (YO on odd rounds, knit on even rounds)

Repeat stripes in rounds of 20 rounds in MC, 5 rounds in CC1, 10 rounds in CC2, 5 rounds in CC1 until you reach desired length.  I did 20 in MC, one set of contrasting colors, 20 in MC, a second set in contrasting color stripes, then ended with about 5-10 rows in MC before starting the seed stitches.

End in MC.  You do not need to do the seed stitch at bottom.  But I think it adds a nice finishing edge. But do end on a knit round, not a yarn over round, if you decide to skip the seed stitch at the bottom.  If you don't do the seed stitch for the bottom four rows, it will curl up, but once you add the fringe, it will lay flat. 

Thursday, April 30, 2009

Summer Word Art FREEBIE!

First, go check out this post.

Do it before July 8th, 2009.

That's only if you'd like a chance at winning a $250 gift card.

Otherwise, just ignore it.

==========

Ok, now that you've got that out of your system, let's go onto a freebie!

We just had our first heat wave.  95 degree weather in April.  For three days we sweltered.  And sweated. It was too hot too sleep.  Too hot to cook.

But, let me tell you . . . there is NOTHING better than sucking on a popsicle and dipping your toes in the kiddie pool during the worst heat of the day!

And it inspired me to make these.  Six pieces of word art and a grassy green background.

Nixon_SummerDreamsWordArt

Click HERE to download them.

Let me know if you like 'em or just leave a comment saying hello!

Then let's sit back and dream of beautiful summer days!

Saturday, April 18, 2009

Girl's Knit Tank Top Pattern

I had a couple requests for the pattern that I used to make this:

312-0414

So, here it is!  This pattern is knitted in the round.  Except for first four rounds.  Then it is split into flat knitting at the armhole.  The back and the front are the same.  Except the front is where I worked the straps.  I then grafted the straps to the back.  You can also bind off and seam.  Explained below!

Girl's Knit Tank Top
(approximately size 6)

Materials:
Cotton Blend Yarn (3 balls)
(I used eco-cotton, 75% cotton, 25% acrylic)
Size 6 circular needles
Stitch Holders

Sorry, no gauge.  I had her try it on every 10-20 rounds to make sure it was heading in the right direction though!

Cast on 180 stitches.
Knit first four rounds flat.  (Or, if you want, you can do this in a seed stitch, instead of knitting, to mimic the pattern in the bodice.  There is a note below on seed stitch.)

*Tip.  Do not try to join the first round.  It's virtually impossible to cast on 180 stitches and start knitting in the round, on circular needles, and NOT have twisted stitches.  Believe me.  I would do 8-10 rows before realizing how twisted things were and would have to rip it all out and try again.  More than once.    Then I found the tip to knit the first four rounds flat.  That gives the piece enough weight so you can, carefully, check that nothing is twisted before joining!  You will have to later seam up those four rows but that is very easy compared to ripping things out three times!

After row 4, join in the round and knit each round until piece measures 10 inches or so. (rows 4-60)

Shape Yoke
*k1, K2tog* repeat around (120 stitches)
*k18, K2tog* repeat around (114 stitches)

Note: in the following row, I placed markers every 20 stitches.  (the last section had 14 stitches) It just helped me keep count when doing this series of stitches.  I also painted the marker that marked the end of my round pink with nail polish so it would be obvious when I had made the round. This isn't necessary, but I found it helped.

Continue knitting in a seed stitch (knit one, perl one; next round perl one, knit one) until yoke is about 2.5 inches or so.  (About 20 rows.)

(For those that don't know the seed stitch, it's a pattern of knit one, perl one.  Then in the next row or round, you do the opposite.  So perls are on top of knit and knits are on top of perls.  It gives the pattern you see here at the top of the tank.  The top is seed, the bottom is the knitting in the round that is stockinette stitch.)

seed

Shape Armhole
Bind off first 8 stitches and continue in seed for 49 stitches. Place those 49 stitches on a holder or a scrap of yarn.

Bind off next 8 stitches and knit 49 stitches in seed.

Now, working flat in seed. (see note below) Decrease 1 stitch at the end of row. 6 times. (37 stitches)

(Note: when you switch to flat, instead of in the round, pay attention to be sure you have the opposite stitch above each stitch.  It's easy to see once you have the pattern going, so don't worry!)

Work until yoke measures 4.5 inches or so. (14 more rows)

Shape Neck.
Knit 6 in seed and slip to a holder.  This will be one of the straps.
Bind off 25.
Knit last 6 stitches, in seed.  Work in seed stitch on 6 stitches for tie for about 7" (63 rows).

Before ending, this is a good point, to try on your model.  See if the straps seem long enough.  The back will come up the same amount as the front.  If it looks good, Bind off.  Unless you are feeling brave enough to try the kitchner stitch then slip onto holder.

Pick up other 6 and knit on those 6 stitches for 63 rows. Bind off or, again, slip on holder if you are feeling brave.

Finish Back
Pick up back 49 stitches.
Working flat just like the front.
Knit in seed stitch, decreasing 1 stitch at the end of each row 6 times. (37 stitches)

Work until yoke measures 4.5 inches or so. (14 rows)

Bind off all stitches unless you are feeling brave.  Then, seed stitch first 6 stitches and slip on holder.  Bind off middle 25.  Seed stitch last 6 and slip to holder.

If you bound off straps, sew straps from front to back.  If you left the stitches live, graft 6 stitches from front to their corresponding side on the back. (I won't even attempt to explain this stitch.  I watched this video by the Knit Witch on youtube and followed along with her step by step!)

Weave in loose ends and seam up those first four rows.

Put on model and ask her to twirl!

316-0414

Tuesday, March 10, 2009

Facebook Privacy Settings {how-to}

I love Facebook.

It took me a while to figure it out but once I started adding friends and family and regularly updating, it became fun.  And a really great way to connect with people I, unfortunately, lost touch with over the years.

But as I'm not a college student any more, some of the settings befuddled me for a while.  Then I started reading about privacy settings and such.  I found an out-of-date article on how to update the privacy settings and after playing around a bit, got them figured out.

And I thought I'd share them.  Because, Facebook uses your real name.  That is the advantage of it.  That lets people find you.

But sometimes there are things you really don't want to share with the rest of the world.  I'm not overly afraid of internet predators but I do believe in being cautious.  That means I may list the area of the country I live in, but I don't list the town.  And I don't list the birthdays or names of children. (And if you are a professional, then you do want to limit what pictures your boss can see of your recent drunken bbq!)

(And, when you have a moment, read this post to see more about an incident I had with posting my pictures of my kids online and watch this video.)

Ok, ok.

You use Facebook and you want to be a little more cautious with the information you are putting out there.

This is some basic information on how to do that.  (This is written in March 2009.  If Facebook changes their interface, I'll try to come back and update images, etc.)

Here I am.

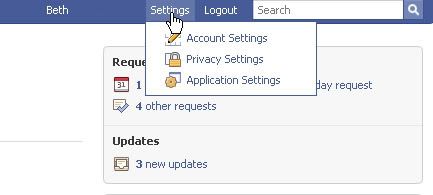
The very first thing to do is click on the Settings over on the right top. And click on Account Settings.
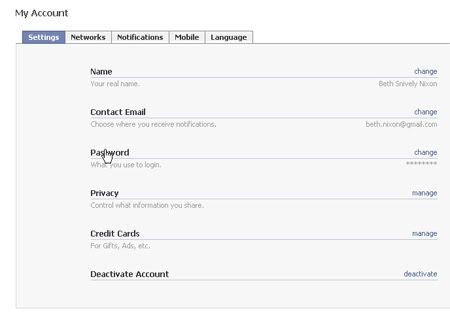
Then click on Password and change that IF it's the same as your email.  If you are like most people, you use the same password for a lot of things. (and actually this is a good tip for anyone, change your email password to something unique and different.  If someone gets into your Facebook account, or any account, then can then easily get into your email and do some real damage without you ever noticing it. )

Once you click on settings, you'll come to this screen and click on password. So, change this password.  (And change your email to something different.) 
 

After you've done that, while you are still under My Account, (I didn't include directions for that as it's pretty standard) go to the next tab, Networks.

By default, Facebook includes you in a geographic network near where you live.  I live by a big city.  I actually don't want everyone that lives around here able to see my information by default.

Just opt out of any networks. (Or add them here if you do want to be included. But a little bit further down, I'm going to touch on groups and that way you can limit if your entire network can see everything you post.)

Still under My Account, now click on over to the Notifications tab.  This one is pretty important.  This shows you when you will be notified of certain activities.  The important things?  Under Photos.  Be sure to click ON if someone tags you in a photo.  Same with video. ("Tags me in a photo")
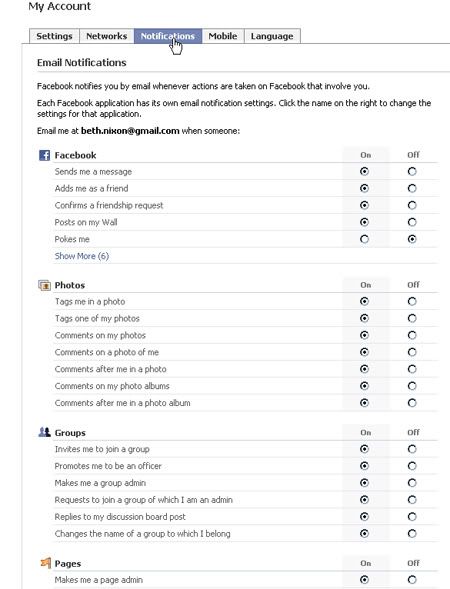
That way you will be alerted if a friend has posted a photo and tagged you in it.  Believe me, you want this.

First, it's fun to see photos of yourself.

Unless you are, let's say a teacher.  And the photo is from an old college party where you were showing off how well you could do shots of tequila.

You may want to un-tag yourself and ask your friend to either delete the picture or restrict privacy or just leave your name off it.  Whatever you are comfortable with.

Because here's something I didn't know.  The DEFAULT setting photos is to allow EVERYONE to see them.  So if your friend has the default setting on, everyone will see you doing those shots of tequila!

(And, again, I'll talk about groups in a minute.  That will tell you how you CAN post pictures of yourself in those tequila situations and limit the visibility to only certain friends and not everyone!)

I did tag a friend in a photo that she then untagged.  (and yes, you can do that!  If you don't want to be tagged, you'll see an option, below right on the photo, to un-tag yourself. ) It was my mistake and I should've known better as she doesn't post pictures of herself or her family online.  I have since deleted the picture.

Ok, next is Privacy Settings.  Up on the upper right, click Settings and then choose Privacy Settings.
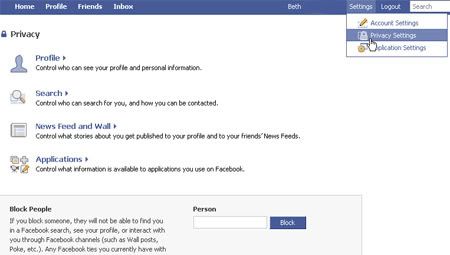
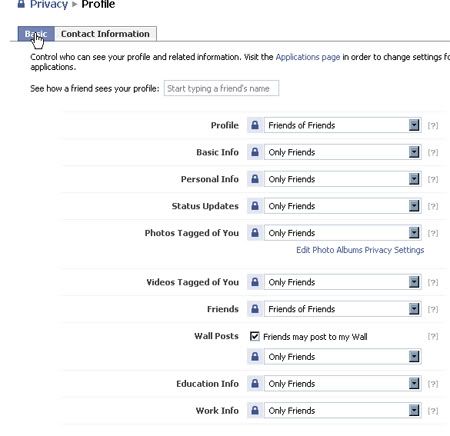
First, choose Profile.  This is where you can choose what people can see what.  Your options are "Friends of Friends", "Only Friends" and for some of them "Customize."

I've chosen Only Friends for most of them.  Besides profile.  I figure if it's a friend of a friend, it may help them determine if they really know me!
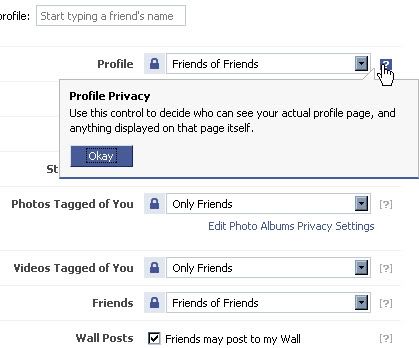
And if you aren't sure what something is, see that little question mark to the right?  Click on it and a short definition will appear.
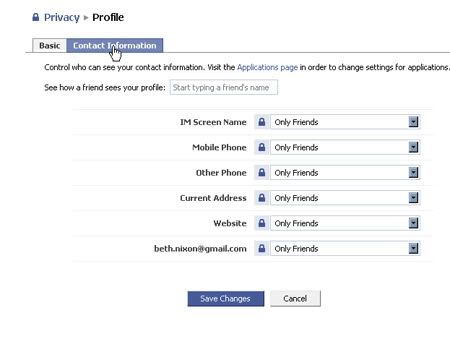
Stay under privacy, but now click on the Contact Information tag.  Choose which settings make you comfortable.  I actually don't want most people to see my information.  Although some can be changed to No One.  Limiting access completely!  Just choose what makes you comfortable.
Ok, next is understanding Friend Lists and putting people in groups.

First, why would you even want to put people in groups?  Well, let's say you found a really great picture of you and your best friends from high school.  You could set it so only your high school friends could see it.  Maybe it's a picture you don't really want your boss or the other moms from play group to see.

It's a great option to have.

First, on the top bar, click on friends.  You'll see your friends with their latest status updates. (just a note, on my examples here, I've whited out names so it may look just a little weird.)

On the left, you'll see Friend Lists.
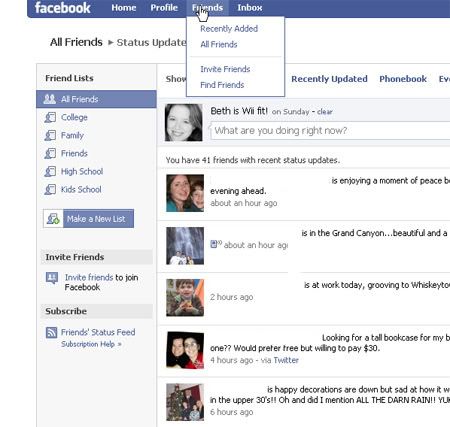
Clicking on All Friends, give you a list with all your friends.
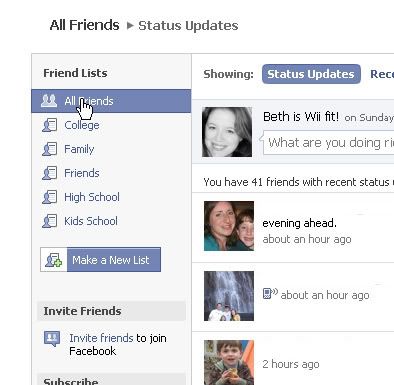
I have several groups set up.  Below, I clicked on Family.  That shows everyone on Facebook that is in my extended family.
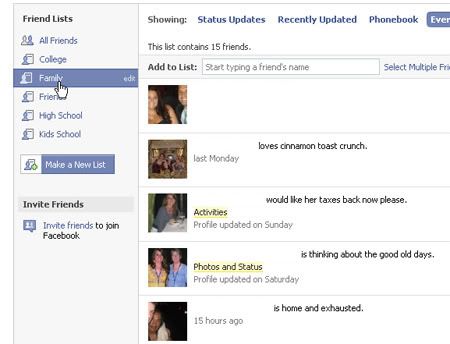
I've also got lists for high school, college, and parent's from the kids school.
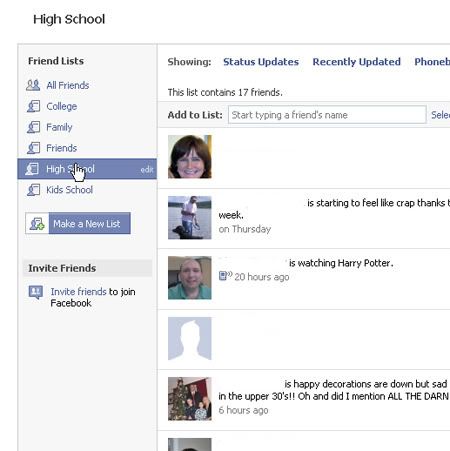
So, here's how to create your own group.

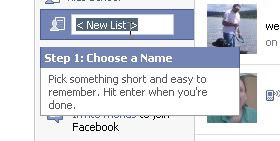
Below the Friend Lists, you'll see a blue bar that says "Make a New List."
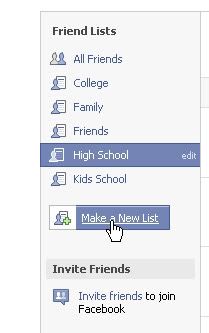
Click on that and choose a name!  Make it simple and self explanatory. (I named this one "Test" for this example.)
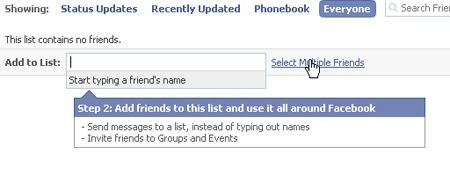
Next, you'll have an option to add people to your new group.  You can do it one by one, or click on the link for Select Multiple Friends.
Then just click on anyone that you want to be in that group!  (again, my list below looks a little odd because I've whited out all names, etc.  You would have names next to each of your little thumbnail pictures!)
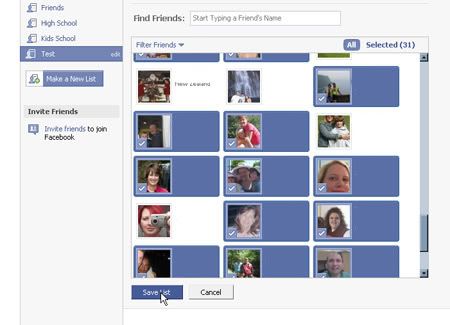
Then click Save List!

That's it.  You've just created a group.

Ok, now where do you use this?  There are several ways but the most important, to me, is photos.  (I think you can edit just about everything to certain groups and they would follow these same general guidelines.)

Go to Your Photos.  There you will see all your albums.  And as the default setting is to allow your photos to be seen by EVERYONE, if you want a different setting, you have to make the change to EACH album.

Here I'm going to change the settings to my album, "the 1980s!"

Click on "Edit Album."
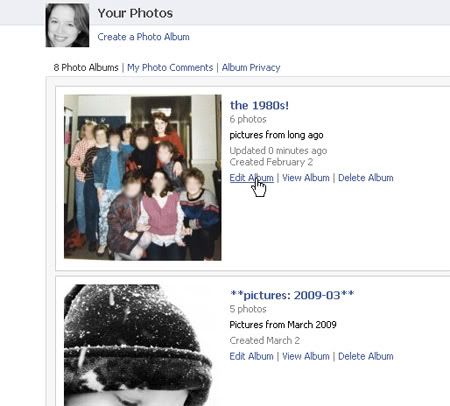
That brings up this set of tabs.  Click on "Edit Info."

This brings up the place to change the Album Name, the album Description, and the Privacy for that particular album.
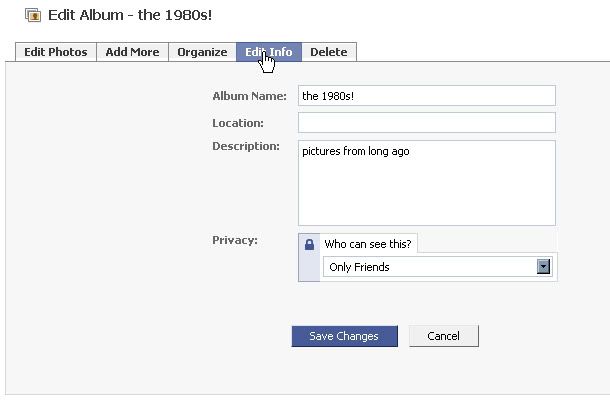
Click the drop down for Privacy.  I usually pick "Only Friends."  For most of my pictures, if you are my friend on Facebook, I'm ok with you seeing pictures.  (although I still don't list my kids names or specific locations (like schools or cities) on my pictures)
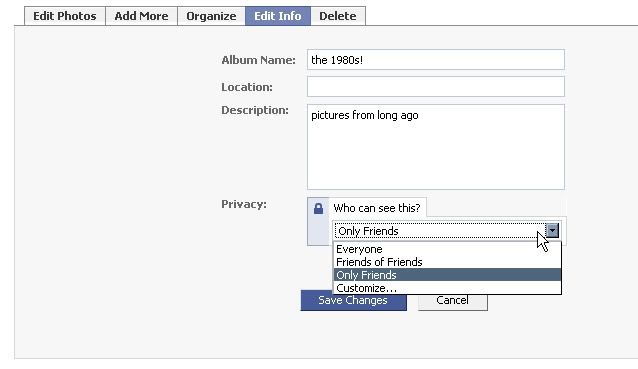
Ok, let's say you have a picture of a wild college party that you really don't want anyone in your family to see but you know your college friends would love to see it.

Click "Customize . . . " on that drop down box above.

This is what will come up. And now you can customize it using those groups you just created!  You can see your options below.

Everyone on Facebook, Friends of Friends, Only Friends, Some Friends, Only Me, and even the option to block only a certain few people . . . like your boss!
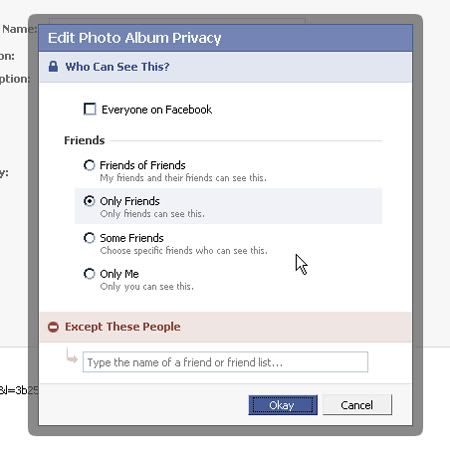
For this example, I'm choosing Some Friends.
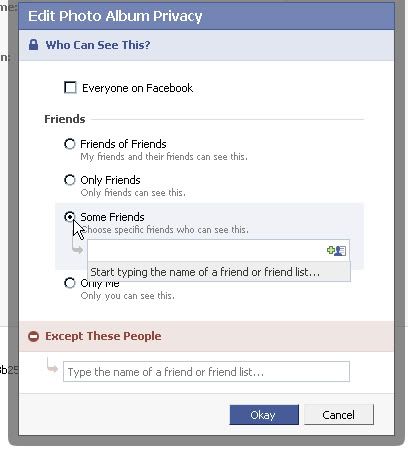
And when the box comes up, I can type individual friends names OR I can just type in the name of the Friend List I just created!

Here I typing in Test, the new group I created for this example.
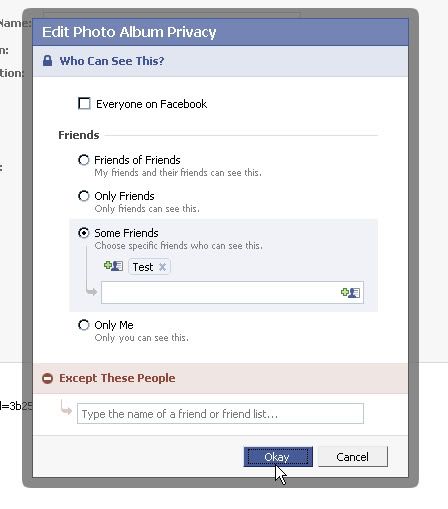
And there you go!  Click Okay and now these pictures will ONLY be visible to that group of people!

Be sure to do this to each individual photo album you have.  Change the settings from Everyone on Facebook to something that you feel comfortable with.

Hopefully that will give you enough information to take a look at your settings, and change things to where you are happy with what people are seeing and make sure that only those that you want to see things, will.

And a quick note to those of you with young teenagers.  These settings are not a secret.  They will know about them WAY before you do.  So, if you have a younger teenager, you may want to ask them to show you their privacy settings so you will know what is and isn't going on with them. Because even if they are your friend, they can very easily block you from seeing pictures and other information. That discussion is best left between you and your child but now you have the information to approach them if you think it's necessary.

Monday, March 2, 2009

Confessions {Plus Glow Freebie}

{edited to include freebie info only}

Now, a freebie.

I posted a layout the other day. My first layout in weeks and weeks. I found a few tutorials at Vunky Search and I couldn't resist playing. A lot of the stuff there was WAY out of what I could figure out. But I read a bunch of them and came up with the glow set of squiggly lines.

Then I threw in some glowing love and a basic gradient background just for fun.

And now, I'm giving them away. Just cool lines to add to a digital scrapbook layout or any photo!

If you like 'em, leave me a comment, here on the bog, and let me know if you want more! They were fun to make (although a tad tedious) and if enough people are interested, I'll put together another set. Something with flowers and little leaves and hearts, I think . . . so . . . let me know!

Click to DOWNLOAD the Glow set of lines!

Nixon_Glow_PREVIEW

Thursday, January 1, 2009

The Ultimate Computer User Accessory! {Pattern Below}

If you use a computer . . . and it gets cold where you live . . . then you know all about mouse hand.  That ice cold hand that's using the computer mouse.

And if you get "mouse hand" then you need fingerless gloves or arm warmers!
(and if you're Meg, don't look as this is what will be mailed to you in a few days!)

I made one for me a few days ago. 

Since then I've revised the pattern and added some fun funky stripes for Meg.

knit1

Now, you can buy arm warmers or fingerless gloves.  Some of my favorite can be found at sockdreams.com.  But, if you are a knitter and want to know my pattern, then I've put together mine below.  I found the basic pattern online by googling "knit arm warmers" but I revised it to fit my knitting preferences and the stripe I wanted.

(and note, I'm not an expert knitter.  And I have my quirks.  Such as I despise the first row after casting on.  Despise.  And I really only like to perl.  So, I perl the first row after casting on.  Regardless of what is called for in the pattern!  And I have a favorite set of knitting needles.  Size 7.  If at all possible, I tweak patterns to fit my size needles!)

Ice Cold Mouse Hand Hand Warmers by Beth
(original pattern modified from this one I found online)

Supplies:

  • Two colors of yarn (I used basic acrylic as I wanted something sturdy and washable.  There's prettier yarns out there but for this, I wanted something sturdy, washable, AND pretty!)
  • Size 7 knitting needles
  • Not needed but helpful: stitch markers, row counter, yarn needle

knit2

(two notes: Cast on and bind off loosely so cuffs will be a bit stretchy.  When switching colors leave a good 8 inches or so for seaming at the end.)

Cast on 38 stitches, loosely, of color #1.

Perl (or knit) first row across.
(you can start right in the rib stitch as described below, this is just my preference)

Work in knit 1, perl 1 rib for about two inches.
(I did 10 rows of rib.)

Switch to color #2 and begin Stockinette stitch (knit 1 row, perl 1 row).  Complete 4 rows in color #2.

Switch back to color #1.  Continue Stockinette stitch in color #1 for 6 rows.

Switch to color #2.  Stockinette stitch for 4 rows.

Switch to color #1.  Stockinette stitch for 8 rows.

Now we start something a bit more exciting!

Switch to color #2.  Continue the Stockinette stitch for 2 more rows.

On the next row, still in color #2, knit 2 stitches.  In the next stitch, increase 1 stitch, then slip the stitch marker on your needle.  (A safety pin would work as well but a stitch marker is easy AND fun!) Continue to knit.  Three stitches before the end of the row, slip on your stitch marker.  In the next stitch, increase one stitch then knit to end of row. You should know have 40 stitches on your needle.

Perl back.

(If you are doing the increases correctly, you'll see the stitch markers move in from the end.  They should each move in towards the middle the same amount each time you knit a row.  Just remember to increase BEFORE the first marker and increase AFTER the second marker.)

Switch to color #1.

Knit to before stitch marker.  On the stitch before the marker, increase one stitch.  Knit to next marker.  On the first stitch after the marker, increase one stitch.  (You should know have 42 stitches on your needle.)

Perl back.

Continue the last 2 steps for 2 more sets of rows, increasing on the knit, perling back.  After these 4 rows you should have 46 stitches on your needle.

(This is where that row counter comes in handy but a piece of paper and pencil works just as well!)

So, you have now knitted a total of 6 rows in color #1.

Switch to color #2.  Knit to before stitch marker.  On the stitch before the marker, increase one stitch.  Knit to next marker.  On the first stitch after the marker, increase.

Perl back.

Repeat, once, those last two steps in that same color #2.  You should have a total of 50 stitches on your needle. 

Bind off in knit, the first 8 stitches.  (You should bind off to your first stitch marker.)

Knit the remainder of the row.

Bind off in perl, the first 8 stitches. (You should bind off to your first stitch marker.)

Perl the remainder of the row.

You should now have 34 stitches on your needle.

Switch back to color #1. (last switch!!)  Work in rib (knit 1 stitch, purl 1 stitch) for the next 8 rows.

Bind off, loosely, in rib pattern.

The knitting is done!

To finish, put together in reverse.  Take those loose ends and, with a yarn needle, starting at the top (the 8 rows you just finished) seam together the top ribs down the side.

knit3

You'll then come to the thumb hole.  Leave that open.

knit4

Skip down to the end of those 8 stitches you bound off and start seaming down.  I switched colors on the way down, depending on the stripe color to match using those loose ends from switching colors.  It's not necessary but is a nicer finish. 

End with the bottom rib, leaving the bottom open to slip your hand in!

Weave in all other loose ends and snip loose ends.

Repeat for second glove.  I switched the colors so they are opposite matches!

Wear.

Keep warm.

Smile.

Keep "mouse-ing!"

knit5 

And for those of you that are instruction impaired, like me, here's the picture I drew of the row counts and color switches!

First 10 rows (plus 1 because of my inability to do anything but perl after casting on) is a rib pattern (knit 1 stitch, perl 1 stitch).  Then the stockinette stitch for the next 36 rows (knit 1 row, perl 1 row) switching colors as indicated and increasing rows on knits as indicated.  Then bind off first 8 stitches of next 2 rows as described above.  Then rib pattern for the top. 

knit6

And if you make one, let me see it!!  I'm hoping to make one more set but I need to sort through my yarn to see what colors I have!